from psychopy import visual, core
from DeToX import ETracker

# 1. Create the Window
# This is where all our stimuli (and the calibration points) will appear
win = visual.Window(
    size=[1920, 1080],  # Window dimensions in pixels
    fullscr=True,       # Expand to fill the entire screen
    units='pix'         # Use pixels as the measurement unit
)

# 2. Connect to the Eye Tracker
# We create an ETracker object which automatically finds and connects to the device
ET_controller = ETracker(win)Calibrating eye-tracking
Eye-tracking
Python
Keywords
eye-tracking, calibration, tobii, psychopy, DeToX, experimental psychology, tutorial, experiment, DevStart, developmental science
Calibration: The Basics
Before running an eye-tracking study, we usually need to do a calibration. What is a calibration, you ask?
Well, an eye-tracker works by using illuminators to emit near-infrared light towards the eye. This light reflects off the cornea, creating a visible glint or reflection that the eye-tracker’s sensors can detect. By capturing this reflection, the eye-tracker can determine the position of the eye relative to a screen, allowing it to pinpoint exactly where the user is looking.
But why is this step necessary?
Every eye is unique. Calibration allows the software to build a custom mathematical model for each participant, accounting for individual differences in eye shape, size, and how the light reflects off their specific cornea. Without this step, the eye-tracker’s gaze estimation will lack precision and accuracy, potentially introducing significant offsets in your data.
![]()
This process is essential for data quality. Good eye-tracking data starts long before you present your first stimulus—it begins with proper setup and calibration. This is particularly critical when testing infants and children, where data quality can be challenging even under ideal conditions.
How do we run it?
You have a couple of options to perform this crucial step:
Tobii Pro Eye Tracker Manager: This is a free software from Tobii. It is reliable and easy to use. The main problem is that the calibration is not really “infant-friendly”—it usually involves very small moving dots that might not capture a baby’s attention effectively.
DeToX (via Tobii SDK): We can use DeToX to do just that! We created this library to wrap around PsychoPy and the Tobii SDK, allowing you to run flexible, infant-friendly calibrations (using fun images and sounds!) without the headache of coding it all from scratch.
In this tutorial, we will use DeToX to handle the heavy lifting. We’ll focus on two essential steps:
Positioning your participant in the eye tracker’s optimal tracking zone.
Running the calibration procedure.
Get these right, and everything else falls into place.
Part 1: Positioning Your Participant
Understanding the “Track Box”
Every eye tracker has a track box—an invisible 3D zone in front of the screen where it can accurately detect eyes. Step outside this zone, and your tracking quality drops fast!
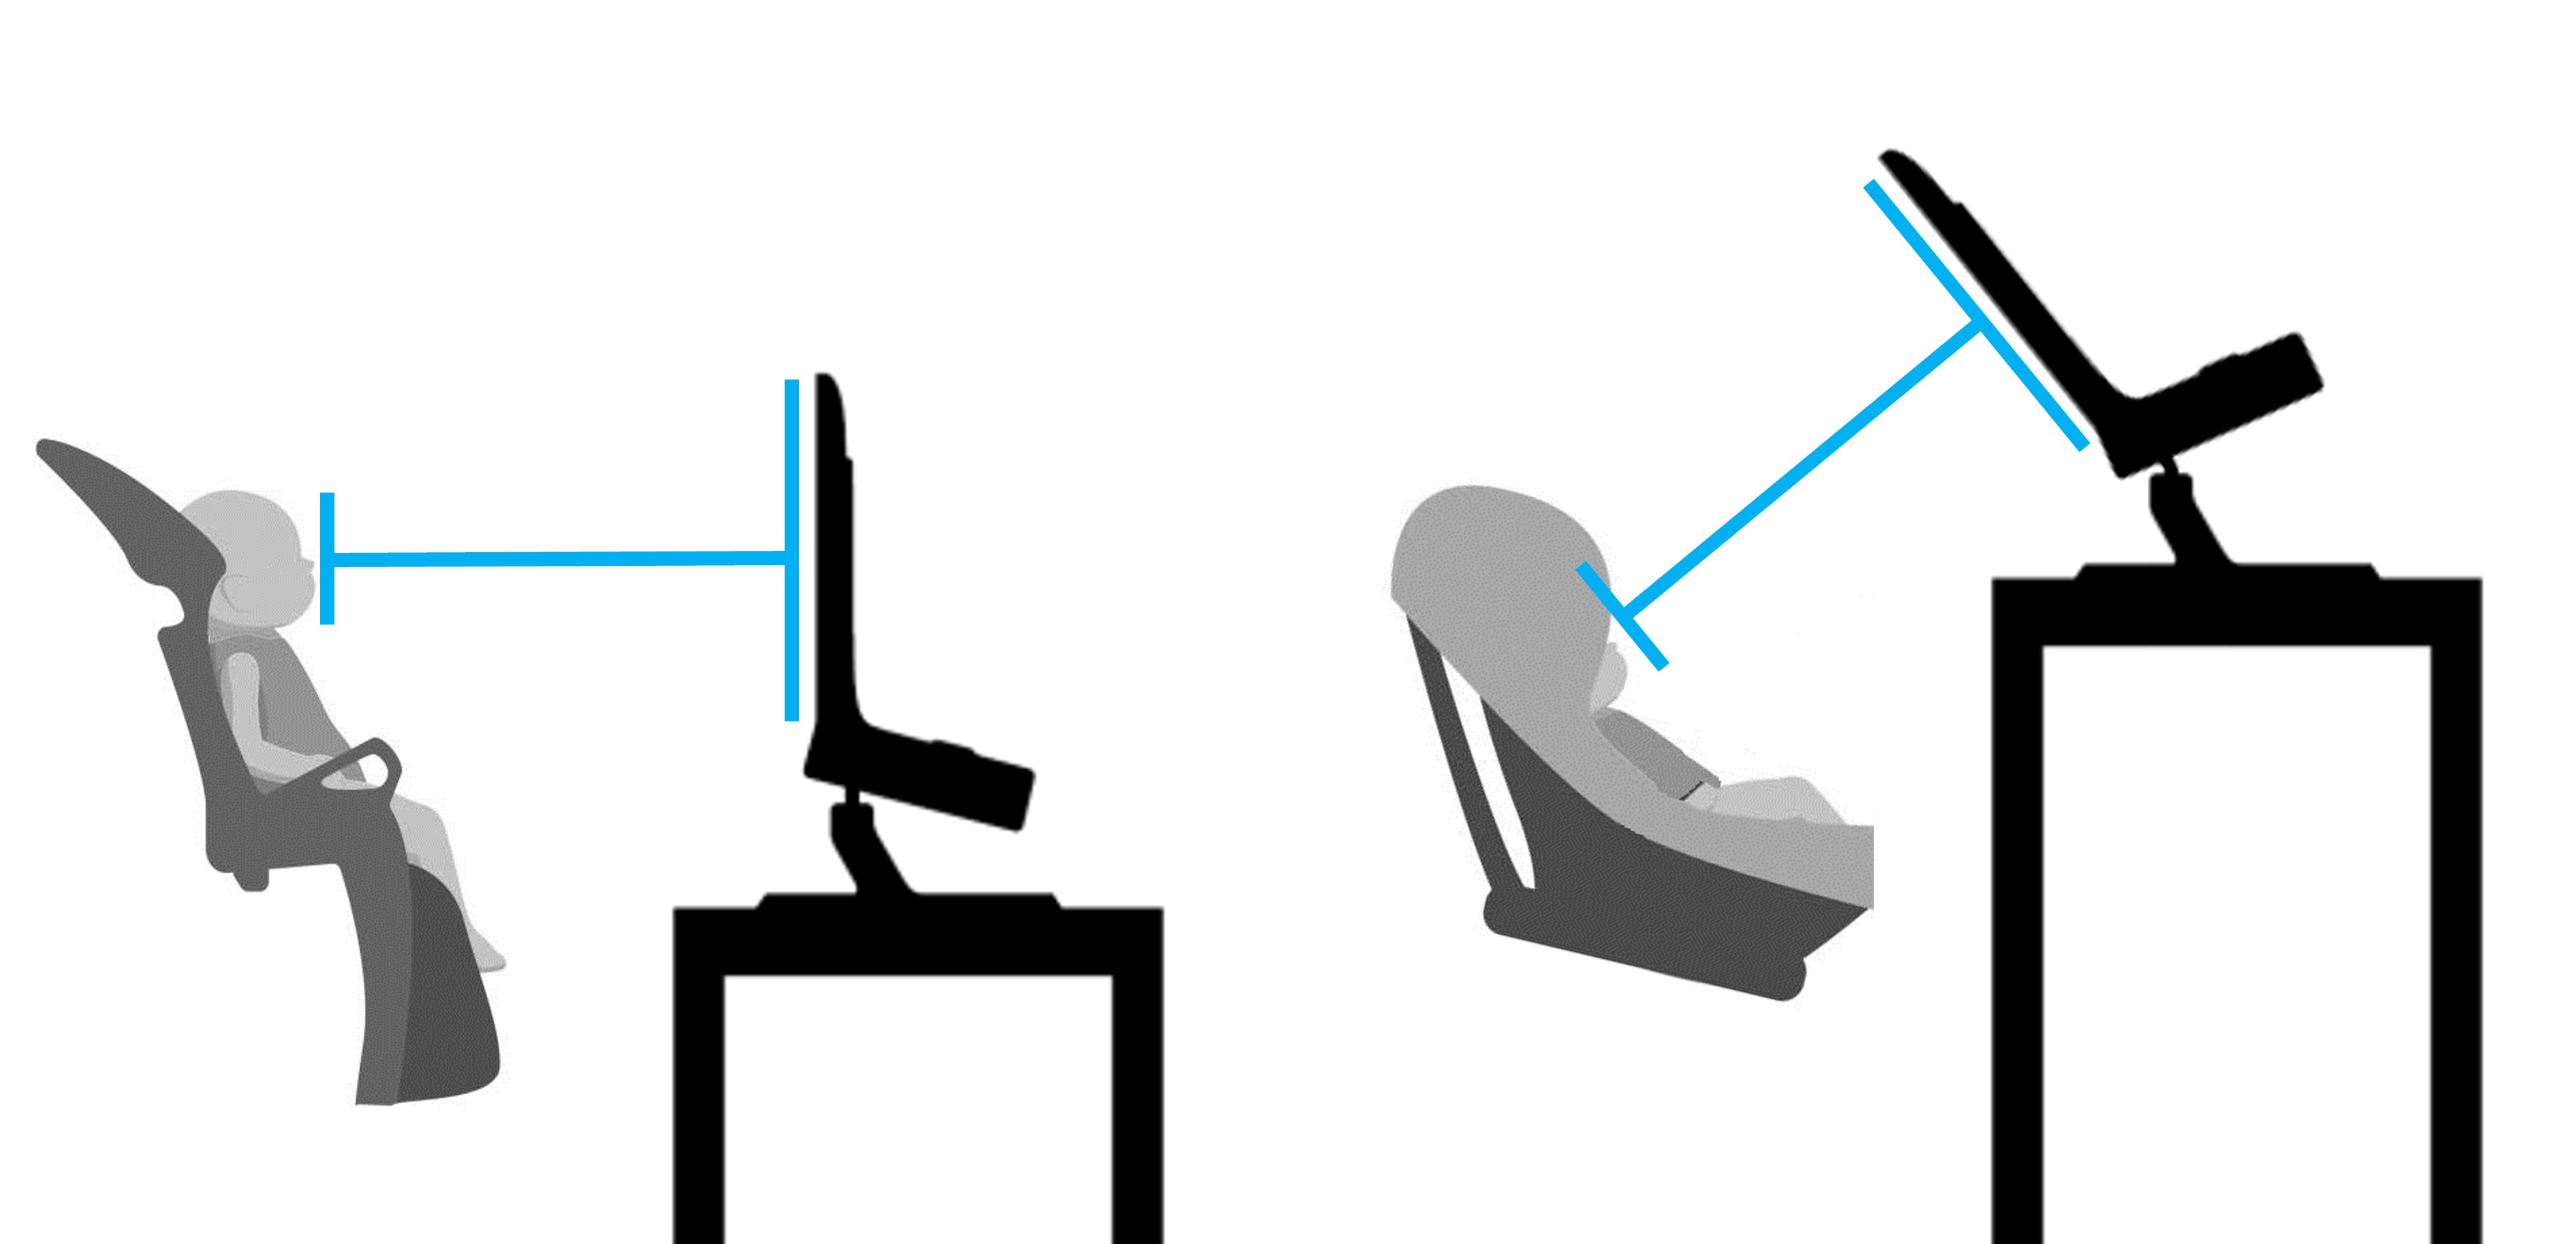
While we try to seat everyone consistently, even small differences in posture or chair height can matter. The goal is simple but crucial: center the participant’s eyes on the screen and ensure their gaze is perpendicular to it.
You can see here two classic scenarios of infants in front of an eye-tracker. Whether they are in a high chair or on a parent’s lap, the important thing is that the head and gaze of the child are aligned with the screen.
But …how do we check it?
We could just eyeball it, but “it looks about right” isn’t exactly scientific rigor. The good news? DeToX makes checking the position as easy as calling a single method.
Setup Code
First, let’s get our script running. We will follow the same steps from the previous tutorial to set up our window and connect to the tracker.
What is happening here?
We import the necessary librarires.
We create a standard PsychoPy window.
We initialize
ET_controller. This one line does a lot of heavy lifting: it searches for connected Tobii devices, establishes communication, and links the tracker to your window.
If everything is working, you will see connection details printed in your console. Now, our ET_controller object is ready to take command!
Checking Position in Real-Time
Now for the magic—visualizing where your participant’s eyes are in the track box:
ET_controller.show_status()What You’ll See
When you call show_status(), an animated video of animals appears to keep infants engaged. Overlaid on the video are two colored circles—🔵 light blue and 🔴 pink —showing where the tracker detects your participant’s eyes in real-time. A black rectangle marks the track box boundaries where tracking works best.
Below the rectangle, a green bar with a moving black line indicates distance from the screen. The line should be centered on the bar (about 65 cm distance).
![]()
Simulation Mode
If you’re running with simulate=True, the positioning interface uses your mouse instead of real eye tracker data. Move the mouse around to see the eye circles follow, and use the scroll wheel to simulate moving closer to or further from the screen.
Center both colored circles within the black rectangle. If they’re drifting toward the edges, ask the participant to lean in the needed direction, or adjust the eye tracker mount if possible.
For distance, watch the black line on the green bar. Too far left means too close (move back), too far right means too far (move forward). Aim for the center.
Press SPACE when positioning looks good—you’re ready for calibration!
Customizing the Positioning Display
By default, show_status() displays an animated video of animals to keep infants engaged while you adjust their position. However, you can customize this behavior using the video_help parameter:
video_help=True: Uses the built-in instructional video included with DeToX (default). This is the easiest option and works well for most studies.
video_help=False: Disables the video entirely, showing only the eye position circles and track box. Useful if you prefer a minimal display or if video playback causes performance issues.
video_help=visual.MovieStim(...): Uses your own custom video. You’ll need to pre-load and configure the MovieStim object yourself, including setting the appropriate size and position for your display layout.
Part 2: Running the Calibration
Now that your participant is perfectly positioned, it’s showtime.
In standard scripts, this is the part where you might have to write a complex loop to handle dot positions, keyboard inputs, and validation. In DeToX, it’s a single function call.
Launching Calibration
Here is the command to start the full procedure:
ET_controller.calibrate(
    calibration_points=5,
    shuffle=True,
    audio=True,
    anim_type='zoom',
    visualization_style='circles'
)
Let’s break down what these arguments actually do:
calibration_points=5: This sets a standard 5-point pattern (4 corners + center). It is the industry standard and works well for most studies. You can bump this up to9for higher precision, or even pass a custom list of coordinates if you are feeling fancy.shuffle=True: Randomizes the order of the points. This is crucial for infants—it prevents them from predicting the next spot and getting bored.audio=True: Plays a fun, attention-getting sound along with the visual stimulus.anim_type='zoom': Makes the stimuli gently pulse in size to catch the eye. You can also use'trill'for a rotating animation.visualization_style='circles': Determines how the results are shown.'circles'draws dots where the eye looked.'lines'draws a line connecting the target to the gaze point (visualizing the error).
Note
A quick heads-up: These are actually the default settings. This means you could more simply call ET_controller.calibrate() and get the exact same behavior! We have shown all the settings here just so you can see what you are implicitly passing. For more information and details about all the possibilities, we suggest looking at the DeToX website.
The Workflow
Once you run that code, DeToX takes over the screen. Here is how the process flows:
1. The Controls
First, you will see a control panel. You (the experimenter) drive this process using the keyboard.
┌──────────────────── Calibration Setup ─────────────────────┐
│Mouse-Based Calibration Setup:                              │
│                                                            │
│    - Press number keys (1-5) to select calibration points  │
│    - Move your mouse to the animated stimulus              │
│    - Press SPACE to collect samples at the selected point  │
│    - Press ENTER to finish collecting and see results      │
│    - Press ESCAPE to exit calibration                      │
│                                                            │
│    Any key will start calibration immediately!             │
└────────────────────────────────────────────────────────────┘
2. Collecting the Data
Press any key to enter the active mode. You will see a thin red border indicating that calibration is live.
Select a Point: Press a number key (e.g.,
1). The animated stimulus will appear at that location.Wait for the Gaze: Watch the participant. Wait for them to actually look at the pulsing animation.
Capture: When you are confident they are fixating on the target, press SPACE.
- The system pauses briefly (0.25s) to ensure stability, records the data, and then hides the point.
Repeat: Do this for all points. You don’t need to follow a specific order—follow the infant’s attention!
3. The Verdict (Review)
Once you have collected data for all points (or as many as you could get), press ENTER. DeToX will compute the math and show you the results visually.
You will see the targets on the screen, along with marks showing where the participant actually looked.
┌────────────── Calibration Results ───────────────┐
│Review calibration results above.                 │
│                                                  │
│    - Press ENTER to accept calibration           │
│    - Press Numbers → SPACE to retry some points  │
│    - Press ESCAPE to restart calibration         │
│                                                  │
└──────────────────────────────────────────────────┘
At this stage, you have three choices:
Accept (
ENTER): If the dots align nicely with the targets, you are good to go!Start Over (
ESCAPE): If the data is a mess (the baby was crying, the tracker was bumped), discard it and restart.Retry Specific Points (Number Keys): This is the superpower of DeToX.
Often, a calibration is perfect except for one point where the baby looked away.
Instead of redoing the whole thing, just press the number for that specific point (it will highlight yellow).
Press SPACE, and you can recollect data for just that point. This saves massive amounts of time and patience!
Calibration Complete!
Congratulations! You’ve successfully positioned your participant and completed the calibration procedure using DeToX. With accurate calibration in place, you’re now ready to present your experimental stimuli and collect high-quality eye tracking data.
Here’s a video demonstrating the entire calibration workflow from start to finish:
Save and Load calibration
While we recommend performing calibration at the start of each session to ensure optimal accuracy, DeToX also allows you to save and load calibration data for convenience. In our opinion, this should only be used in special circumstances where there is a headrest and little to no chance of movement between sessions. However, if you need to save and reuse calibration data, here’s how:
Saving Calibration
After completing a successful calibration, you can save the calibration data to a file:
# Save with custom filename
ET_controller.save_calibration(filename="S01_calibration.dat")
┌────── Calibration Saved ─────┐
│Calibration data saved to: │
│S01_calibration.dat │
└──────────────────────────────┘The calibration data is saved as a binary file (.dat format) that can be reloaded in future sessions. If you don’t specify a filename, DeToX automatically generates a timestamped name like 2024-01-15_14-30-00_calibration.dat.
you can also choose to use a GUI file dialog to select the save location:
# Save with GUI file dialog
ET.save_calibration(use_gui=True)
Loading Calibration
To reuse a previously saved calibration in a new session:
# Load from specific file
ET.load_calibration(filename="S01_calibration.dat")
┌───── Calibration Loaded ──────┐
│Calibration data loaded from: │
│S01_calibration.dat │
└───────────────────────────────┘or again, use a GUI file dialog to select the file:
# Load with GUI file dialog
ET.load_calibration(use_gui=True)
Putting It All Together
Well Done!! You have seen how to set up the eye-tracker and run a calibration!! Great job!!
Now that we know how to do it, we need to include the setup and calibration in our actual experimental script.
In the previous tutorials (Create your first paradigm and Create an eye-tracking experiment), we built a simple study and added basic eye-tracking controls. Now, we will see exactly where the calibration fits into that flow.
The Logic of the Script
To integrate calibration effectively, we structure the script into four logical phases:
Initialization & Setup: Here we import the necessary libraries, configure the PsychoPy window, and establish the connection with the eye-tracker.
Calibration & Positioning: This is the new addition. Before recording any experimental data, we must verify the participant’s position and run the calibration routine to ensure gaze accuracy.
The Experimental Loop: This is the core of the study. We iterate through the trials, present stimuli (Fixation -> Cue -> Target), and send event markers to the eye-tracker.
Termination & Cleanup: Finally, we stop the recording, ensure all data is safely saved to the disk, and close the connection and windows.
Here is the complete script. Notice how we inserted the Positioning and Calibration steps right after the setup but before the recording starts.
import os
from pathlib import Path
from psychopy import core, event, visual, sound
from DeToX import ETracker

#%% Setup and Imports

# Screen dimensions
winsize = [1920, 1080]

# Setting the directory of our experiment
os.chdir(r'<<< YOUR PATH >>>>')

# Create Paths
stimuli_dir = Path('EXP') / 'Stimuli'
data_dir = Path('DATA') / 'RAW'

# 1. Create the Window
# We need this first so DeToX can measure pixels correctly
win = visual.Window(size=winsize, fullscr=True, units="pix", pos=(0,30), screen=1)

# 2. Initialize DeToX
# This automatically connects to the eye tracker
ET_controller = ETracker(win)

#%% Load Stimuli

# Load images
fixation = visual.ImageStim(win, image=str(stimuli_dir / 'fixation.png'), size=(200, 200))
circle = visual.ImageStim(win, image=str(stimuli_dir / 'circle.png'), size=(200, 200))
square = visual.ImageStim(win, image=str(stimuli_dir / 'square.png'), size=(200, 200))

# Note positions for targets
complex_stim = visual.ImageStim(win, image=str(stimuli_dir / 'complex.png'), size=(200, 200), pos=(250, 0))
simple_stim = visual.ImageStim(win, image=str(stimuli_dir / 'simple.png'), size=(200, 200), pos=(-250, 0))

# Load sound
presentation_sound = sound.Sound(str(stimuli_dir / 'presentation.wav'))

# List of stimuli
cues = [circle, square]
targets = [complex_stim, simple_stim]

# Create a list of trials (0 = Circle/Complex, 1 = Square/Simple)
Trials = [0, 1, 0, 0, 1, 0, 1, 1, 0, 1]
Sub = 'S001'


#%% Calibration

# 1. Center participant
ET_controller.show_status()

# 2. Calibration
ET_controller.calibrate(
    calibration_points=5,
    shuffle=True,
    audio=True,
    anim_type='zoom',
    visualization_style='circles'
)

core.wait(1)

#%% Start Recording

# Start recording to an HDF5 file
# DeToX creates the file and starts the stream immediately
ET_controller.start_recording(filename=str(data_dir / f"{Sub}.h5"))

#%% Run Trials

for trial in Trials:

    ### 1. Present the Fixation
    fixation.draw()
    win.flip()
    ET_controller.record_event('Fixation') # Log event
    core.wait(1)

    ### 2. Present the Cue
    cues[trial].draw()
    win.flip()

    if trial == 0:
        ET_controller.record_event('Circle')
    else:
        ET_controller.record_event('Square')

    core.wait(3)

    ### 3. Wait for Saccadic Latency
    win.flip()
    core.wait(0.75)

    ### 4. Present the Target
    targets[trial].draw()
    win.flip()

    if trial == 0:
        ET_controller.record_event('Complex')
    else:
        ET_controller.record_event('Simple')

    presentation_sound.play()
    core.wait(2)

    ### 5. ISI and Smart Saving
    win.flip()
    ET_controller.record_event('ISI')

    # Start timer for ISI
    clock = core.Clock()

    # Save data to disk safely
    ET_controller.save_data()

    # Wait for the remainder of the 1-second ISI
    core.wait(1 - clock.getTime())

    ### Check for escape key
    keys = event.getKeys()
    if 'escape' in keys:
        ET_controller.stop_recording() # Stop safely
        win.close()
        core.quit()

# --- End Experiment ---
ET_controller.stop_recording() # Save remaining data and disconnect
win.close()
core.quit()